
Storytime
Or, “how I set out to spend 15EURs and wound up spending 10x that”. That’s excluding the extra parts/upgrades.
Continue reading Fujitsu Primergy TX140 S2: Buyer’s Guide and NAS buildOr, “how I set out to spend 15EURs and wound up spending 10x that”. That’s excluding the extra parts/upgrades.
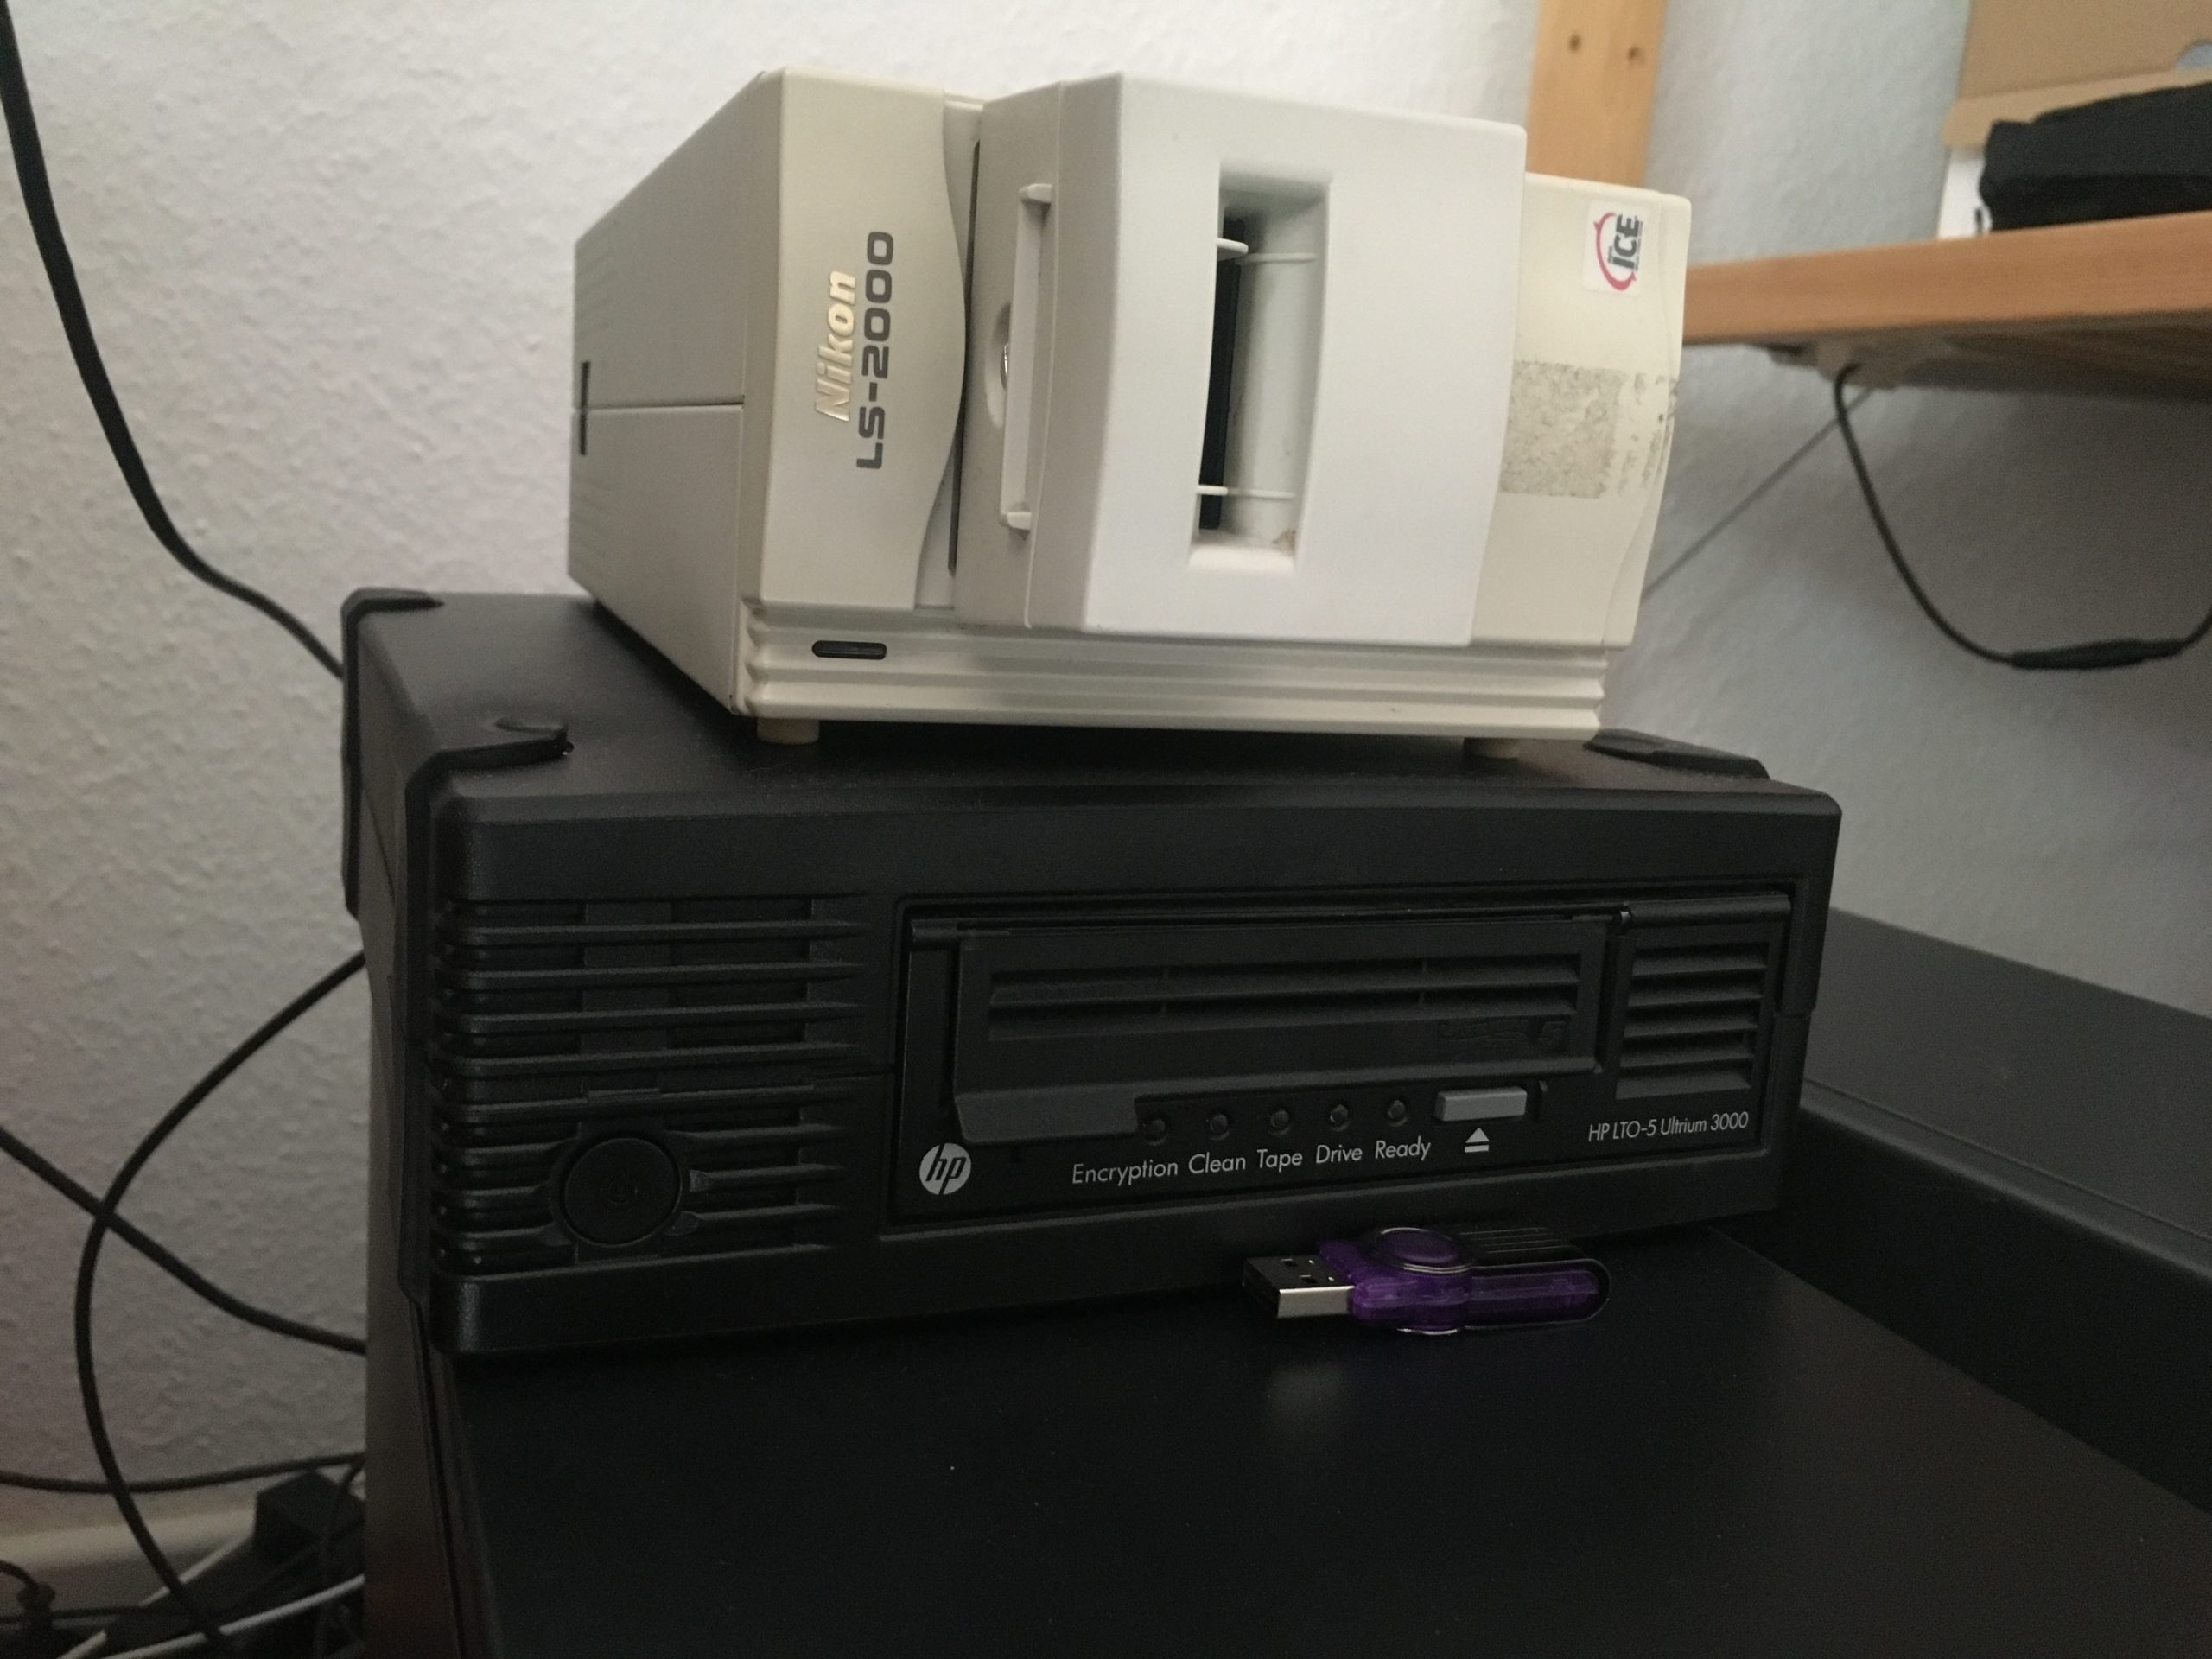
Continue reading Fujitsu Primergy TX140 S2: Buyer’s Guide and NAS buildIn the previous part, I learned how to write data to LTO4 tape, got frustrated and splurged on an LTO5 drive to take advantage of LTFS. The drive came – and it works! It even came with a free HP H222 SAS adapter and 2 new LTO5 tapes.
Yup, screams “serious business”.
Sounds like basic stuff but before LTFS, the only way you wrote to tape was through proprietary software you had to pay a lot for or use Linux’s tar+dd.
When I was young, I downloaded a lot, and burned a lot of CDRs and DVD-Rs. Nothing would ever fit onto them, so I’d have to split movies up, or put some episodes of an anime series here and another there, and that disc had a few megabytes free, so there went a few more episodes… this was a major pain in the ass.
I have also since amassed a 600GB music+photos collection, which I’d hate to lose to silent data corruption, drive failure, ransomware, theft or whatever. No matter how many layers Bluray had, it just wasn’t enough – imagine figuring out how to split all this between 12 BD-R DLs.

The answer: a Quantum LTO4 drive (~200EUR). It’s much longer than a Bluray drive, much noisier, much hotter, and even requires an additional SAS HBA (so all in all, very exotic and sexy). Each tape is 800GB and costs 10-20EURs, and unlike DVD-Rs going bad, tape is much more reliable (all digital movie footage, especially digitized film, is stored on tape these days).
When Naked_Snake1995 posted a way of reviving YLOD PS3s on PSX-Place, I knew I had to try it out.
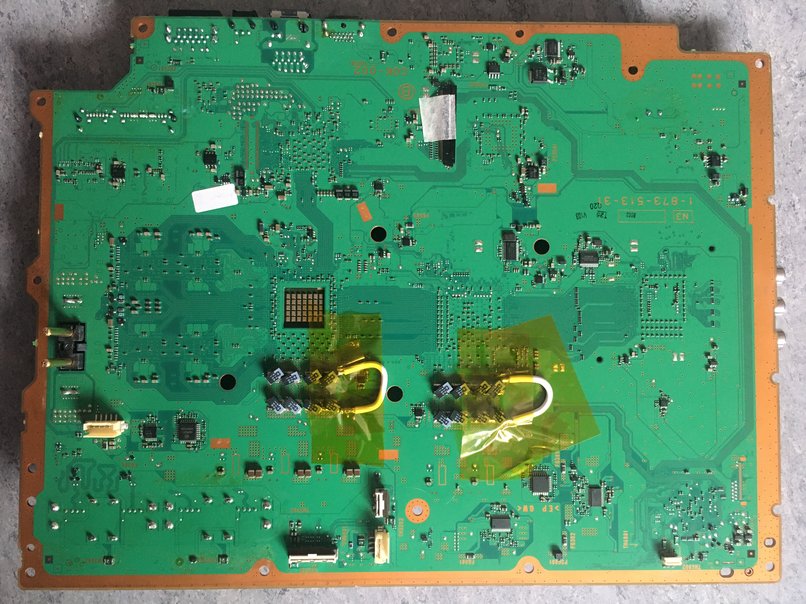
Note: standard sized tantalum capacitors (7.3×4.3×3.8 mm) are taller than the Proadlizers and will push against the motherboard’s aluminum shield on the bottom side (the top side where the chips are has more clearance, because other components right next to it are larger). But it will still fit together.
The hardest part by far. I’ve tried, and my advice is don’t use a hot air station. Most of the heat will go towards melting the plastic instead of heating up the solder underneath. By the time you’ve heated up the pads (takes several minutes if you’re lucky), the board is hot in one place but cold in others, which is obviously very bad for it. Not to mention, many electronic components are meant to endure only a few seconds of heat while reflow soldering.
Just use a sharp paper cutter like this Pakistani – he takes it off in a minute. The sharper it is, the less force you have to use, which means less chances of you knocking something off or scratching the board.
The trick is to not be afraid to dig the blade deep underneath the NEC’s pads. If you can get the blade mostly horizontal, it won’t dig into the board.
This is how mine looked like in the end. I chose a thick gauge wire to connect the + terminals of the capacitors because I assume a lot of current will be flowing through. Make sure it is not too long so it doesn’t obstruct the heatsink screw. Also, it is best to put it on the back side of the motherboard, not the front, so that it stays away from the RAM traces and other hot components.
Unfortunately, that still didn’t work. The YLOD timing is now different – the fan does spin up, but after a few more seconds, and I get 1 group of 3 beeps, not 2 groups of 3 beeps. Still no idea what that means.
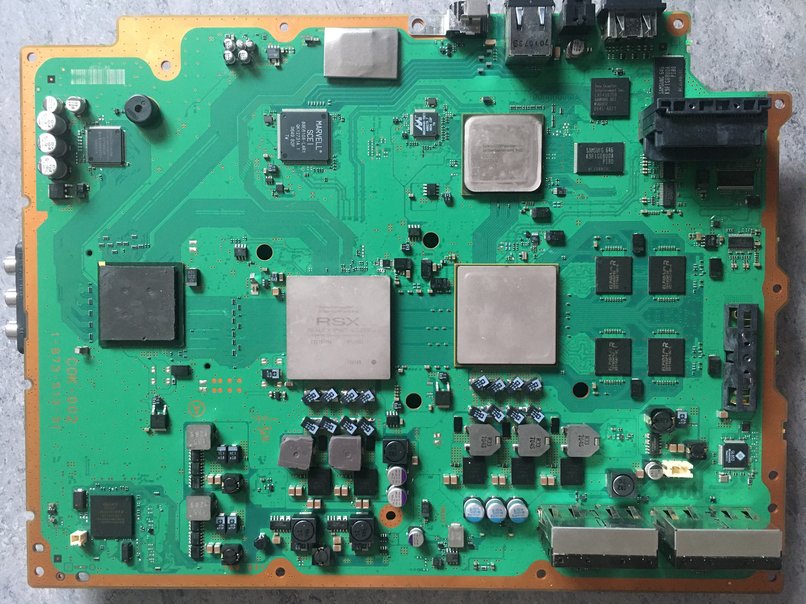
I sent the mainboard off for a RSX reballing, but had no luck.
With the recent release of syscon’s firmware encryption key, one can now talk to the syscon over UART and hopefully figure out what the exact error is. Unfortunately it looks like the syscon only reports errors in codenames, but darknesmonk has shorted a few pins on the RSX to simulate hardware errors and reported what the syscon says.
Before we answer any questions, you need to know the basics of how an optical disc drive works.
A CD spins on the spindle, and the laser reads, moving outwards from the middle of the disc. Think of the data on the disc as a spiral, just like vinyl records, from the inside to the outside. The laser shoots out of the lens, is reflected by the disc, then goes back into the lens and is redirected to a photodiode that responds to some light (CD: infrared light, DVD: red light).
Data is recorded as “pit”s (actual potholes in the media) and “land”s (no depression). The depth of the pit on the CD <0.2 micrometers, so that the light reflected from a pit will cancel the light reflected from a land, so that the difference is very obvious to the photodiode (source).
Now, since you can’t even see the spiral track with your bare eyes, it’s unrealistic to expect that the simple worm gear (coloured arrow) is precise enough to position the laser exactly where it needs to be. That’s why the lens can move sideways (coloured arrow) as well – this is called the “tracking”.
We’re talking about light here so of course we also have to deal with focusing the laser. And since you can’t expect every disc to be perfectly flat or not wobble while spinning, the lens also has to be able to move up and down to always keep the disc in focus as it spins. And of course there is the electronic circuitry to ensure all this happens automatically.
When you insert a CD/DVD into the drive, the lens will light up and try to find a disc, and try to focus. The lens assembly has two laser diodes built in: CDs use infrared, so you can’t see it, but DVDs are a deep red. The lens has a maximum range of movement, and if it goes too far upwards and it couldn’t find focus, it will go to the very bottom and try again.
This Youtube video (really long) explains it very well.
My PS2 is making a rattling sound
My fat PS2 made a rattling sound when the worm gear couldn’t move the laser head and the gear teeth were chattering against each other. But to be sure, open it up and see for yourself.
My PS2 won’t detect CDs/DVDs
If your laser is old and can’t shoot out enough light, then the photodiode can’t tell the difference between “in focus” and “out of focus”. Makes sense right?
My PS2 can read CDs but can’t read DVDs?
As mentioned before, there are two laser diodes, one for CD and one for DVD. If the DVD one is more worn out…
Why won’t it read my CD-R/DVD-R – or reads it slowly
Recordable CDs/DVDs are a totally different animal from official pressed discs. They reflect less, and if you burnt the CD at high speeds, the pits won’t be as deep, so the laser has to shine brighter to find something – and if it shines too brightly, the photodiode might not be able to tell the difference between a 0 and a 1. And if it isn’t sure, it will try reading the same part again…
Some SCPH-5000x PS2s (with a V9/V10 motherboard) had a problem where if the laser couldn’t find anything, the PS2 could drive too much power to the laser, burning it out prematurely. Keep that in mind.
If all else fails, disassemble the PS2 and open the drive to see what’s going on. Here’s what a working mechanism should look like for a SCPH-50000
SCPH-70000
Aliexpress or eBay. PS2 Slim lasers are easier to find than PS2 Fat lasers, which probably means that PS2 Slim lasers aren’t going to be around forever either.
Fat: KHS-400B/C
Slim: PVR-802W